Introduction
In the vast universe of desserts, there exists a rare and magical category: treats that taste incredibly complex and decadent, yet demand astonishingly little effort from the baker. Among these culinary wonders, the dump cake reigns supreme. Imagine a dessert so straightforward, its very name describes the process – you simply “dump” ingredients into a pan, and let the oven work its magic. No mixers, no multiple bowls, no complicated techniques. Just pure, unadulterated dessert gratification with minimal fuss and even less cleanup.
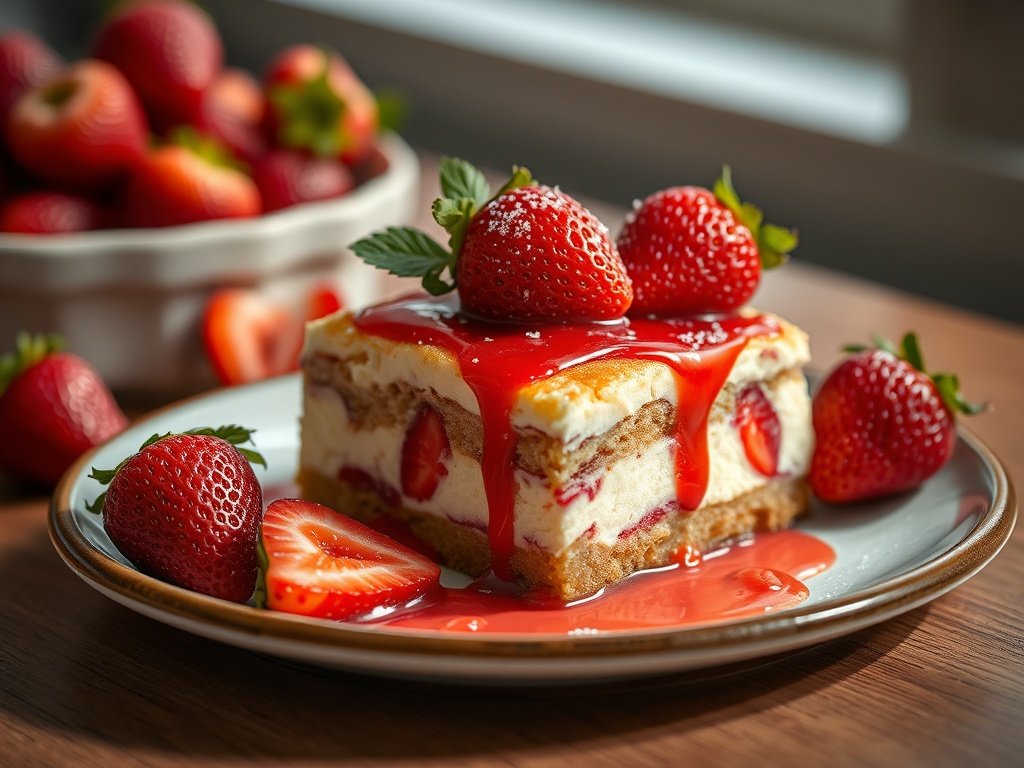
But what if we told you this effortless indulgence could be elevated to an entirely new level of deliciousness? Enter the Strawberry Cheesecake Dump Cake. This isn’t just any dump cake; it’s a game-changer. We’ve taken the bright, juicy sweetness of strawberries and married it with the creamy, tangy richness of cheesecake, all enveloped in a warm, moist, cakey embrace. It’s the perfect symphony of flavors and textures, delivering all the comforting nostalgia of a classic dump cake with an irresistible, sophisticated twist that will have everyone asking for seconds.
Whether you’re a seasoned baker looking for a quick win or a novice intimidated by elaborate recipes, this Strawberry Cheesecake Dump Cake is your golden ticket to dessert heaven. It promises an impressive, crowd-pleasing dessert perfect for any occasion – from a casual weeknight treat to a celebratory gathering – all delivered with virtually no fuss. Prepare to delight your taste buds and impress your guests with a dessert that tastes like you spent hours crafting it, when in reality, it took mere minutes of hands-on time.
Nutritional Information
Per serving (approximate values, based on 12 servings):
- Calories: 395 kcal
- Protein: 3g
- Carbohydrates: 55g
- Fat: 18g
- Fiber: 1g
- Sodium: 320mg
Ingredients
- 2 cans (21 ounces each) strawberry pie filling
- 1 block (8 ounces) cream cheese, softened and cut into small cubes
- 1 box (15.25 ounces) yellow cake mix or vanilla cake mix
- 1 ½ sticks (12 tablespoons) unsalted butter, melted or cut into thin pats
- Optional: Fresh strawberries, whipped cream, or vanilla ice cream for serving
Instructions
- Preheat your oven to 350°F (175°C). Lightly grease a 9×13-inch baking dish with non-stick cooking spray or butter. This step helps prevent sticking, though dump cakes are generally quite forgiving.
- Evenly spread both cans of strawberry pie filling across the bottom of the prepared baking dish. Use a spatula to ensure the fruit and gel are distributed in a uniform layer from edge to edge. This will form the luscious fruit base of your dump cake.
- Scatter the softened cream cheese cubes evenly over the strawberry pie filling. Try to space them out so that each bite of the finished cake gets a delightful pocket of creamy, tangy cheesecake goodness. The cream cheese will melt and meld beautifully into the fruit layer as it bakes.
- Sprinkle the entire contents of the dry yellow or vanilla cake mix evenly over the strawberry and cream cheese layers. Do not stir or mix the layers at this point; the magic of a dump cake lies in its distinct, unmixed layers. Ensure the cake mix covers the fruit and cream cheese as thoroughly as possible.
- Pour the melted butter evenly over the dry cake mix layer. Alternatively, if using butter pats, arrange them closely together over the entire surface of the cake mix. The butter is crucial for hydrating the cake mix, allowing it to transform into a moist, golden-brown topping during baking. Aim for full coverage to avoid dry spots in the final cake.
- Place the baking dish in the preheated oven and bake for 50-60 minutes, or until the top is golden brown, bubbly, and the cake mix has fully absorbed the liquids, forming a tender, cake-like crust. You should see the fruit filling bubbling up around the edges.
- Once baked, carefully remove the dump cake from the oven. It will be very hot and bubbly. Let it cool on a wire rack for at least 15-20 minutes before serving. This cooling time allows the layers to set slightly, making it easier to scoop and ensuring the flavors meld perfectly.
- Serve warm, ideally with a dollop of fresh whipped cream, a scoop of vanilla ice cream, or a few fresh strawberry slices for an extra touch of indulgence. The contrast of the warm, rich cake with cold toppings is simply divine. Enjoy your ridiculously easy and utterly delicious Strawberry Cheesecake Dump Cake!
Cooking Tips and Variations
Mastering the dump cake is less about skill and more about understanding a few key principles. For the Strawberry Cheesecake Dump Cake, here are some tips to ensure a perfect outcome every time, along with exciting variations to keep your dessert game fresh and flavorful.
Tips for Success:
- Even Butter Distribution: This is arguably the most critical step for a dump cake. Whether you melt the butter and pour it, or cut it into thin pats, ensure it covers as much of the dry cake mix as possible. Any dry spots will result in powdery, unbaked cake mix on top. If using pats, arrange them very close together, almost overlapping.
- Softened Cream Cheese: Make sure your cream cheese is at room temperature and soft before cutting it into cubes. This allows it to melt smoothly into the fruit layer, creating those delightful pockets of cheesecake goodness without clumping.
- Don’t Stir! Resist the urge to mix any of the layers. The beauty of a dump cake is in its distinct layers magically transforming in the oven. Stirring will prevent the cake mix from forming its crumbly, cake-like topping and the cream cheese from creating its unique texture.
- Baking Dish Size Matters: A 9×13-inch baking dish is ideal for this recipe, providing enough surface area for the layers to cook evenly. Using a smaller dish might result in a longer baking time and a denser cake, while a larger dish could lead to a thinner, drier cake.
- Check for Doneness: The cake is done when the top is golden brown and the fruit filling is visibly bubbling around the edges. You can also gently press on the cake mix layer; it should feel set and spring back slightly.
- Cooling Time: While tempting to dive in immediately, allowing the dump cake to cool for at least 15-20 minutes after baking is crucial. This helps the fruit filling and cream cheese set, preventing a runny mess and allowing the flavors to meld more deeply.
Delicious Variations:
- Fruit Medley: Instead of just strawberry pie filling, try a mix! Combine one can of strawberry pie filling with one can of cherry, blueberry, or even peach pie filling for a dynamic fruit blend.
- Chocolate Lover’s Dream: Swap the yellow cake mix for a chocolate fudge or devil’s food cake mix. The combination of chocolate and strawberry cheesecake is absolutely divine.
- Nutty Crunch: Before adding the butter, sprinkle a half cup of chopped pecans, walnuts, or almonds over the dry cake mix layer. This adds a wonderful textural contrast and a hint of nutty flavor.
- Spiced Twist: For a warmer, cozier flavor profile, add a teaspoon of ground cinnamon or a half teaspoon of nutmeg to the dry cake mix before sprinkling it over the fruit. This works particularly well with apple or peach variations too.
- Lemon Zest Brightness: Grate the zest of one lemon over the cream cheese layer before adding the cake mix. The lemon zest will infuse a bright, citrusy note that beautifully complements the strawberries and cream cheese, enhancing the “cheesecake” aspect.
- Coconut Kiss: Sprinkle a half cup of shredded coconut over the dry cake mix along with the butter for a tropical twist. The coconut will toast lightly as it bakes, adding a lovely aroma and texture.
- Dairy-Free Option: While the “cheesecake” element is harder to replicate without cream cheese, you can make a dairy-free dump cake by using dairy-free pie filling, a dairy-free cake mix, and vegan butter.
- Individual Servings: For a charming presentation, prepare the dump cake in individual ramekins. Adjust baking time accordingly, likely reducing it by 10-15 minutes, and keep an eye on the browning.
The beauty of dump cakes lies in their adaptability. Don’t be afraid to experiment with different flavor combinations and additions to create your own signature version of this delightful, low-effort dessert!
Storage and Reheating
One of the many charms of the Strawberry Cheesecake Dump Cake is how well it holds up as leftovers, making it an excellent candidate for meal prepping desserts or simply enjoying over a few days. Proper storage ensures it remains delicious and moist.
Storage:
Once your dump cake has completely cooled to room temperature, cover the baking dish tightly with plastic wrap or aluminum foil. If you’ve transferred individual servings to containers, ensure they are airtight. Store the covered dump cake in the refrigerator. Due to the cream cheese and fruit filling, it’s best to keep it refrigerated. It will remain fresh and delicious for 3-4 days. For longer storage, you can freeze individual portions. Place cooled slices in freezer-safe airtight containers or wrap them tightly in plastic wrap and then foil. It can be frozen for up to 2-3 months. Thaw frozen portions in the refrigerator overnight before reheating.
Reheating:
The Strawberry Cheesecake Dump Cake is wonderful served cold, but many prefer it warm, especially if you’re pairing it with ice cream or whipped cream. Reheating is straightforward:
- Oven Method (Recommended for best texture): Preheat your oven to 300°F (150°C). Place individual slices or the entire baking dish (covered loosely with foil to prevent over-browning) in the oven. Heat for 15-20 minutes for individual slices, or 25-35 minutes for a larger portion, until warmed through. The foil helps retain moisture.
- Microwave Method (Quickest option): For individual servings, place a slice on a microwave-safe plate. Heat on medium power for 30-60 seconds, or until warm. Be careful not to overheat, as this can make the cake tough or the filling too runny.
No matter how you reheat it, a warm slice of this dump cake, perhaps with a fresh dollop of whipped cream or a scoop of vanilla ice cream, is pure comfort. The flavors tend to deepen slightly after a day in the fridge, making leftovers a truly delightful treat.
Frequently Asked Questions
What is a dump cake and why is it called that?
A dump cake is an incredibly simple dessert that earns its name because you literally “dump” all the ingredients into a baking dish without any pre-mixing. Typically, it involves a layer of fruit filling, topped with dry cake mix, and finished with melted butter. As it bakes, the butter and fruit juices hydrate the cake mix, transforming it into a moist, cake-like or crumbly topping over a bubbly fruit base. It’s cherished for its minimal effort, minimal cleanup, and consistently delicious, comforting results.
Can I use fresh fruit instead of pie filling?
While you can use fresh fruit, it will significantly change the texture and moisture content of the dump cake. Pie filling contains thickeners and a syrup base that are crucial for the dump cake’s consistency, as they provide the liquid needed to hydrate the dry cake mix and create that luscious, bubbly fruit layer. If using fresh strawberries, you would need to add sugar and a thickener (like cornstarch or flour) to create a similar pie-filling consistency, or the cake might turn out too dry on top and too watery underneath. For this specific recipe, the pie filling is key to achieving the desired “dump cake” magic with the cheesecake layer.
Can I make this dump cake ahead of time?
Absolutely! This Strawberry Cheesecake Dump Cake is an excellent make-ahead dessert. You can prepare it a day or two in advance and store it, covered, in the refrigerator. The flavors often deepen and meld beautifully overnight, enhancing the overall taste. When you’re ready to serve, you can reheat it gently in the oven or microwave, or simply enjoy it chilled. It’s perfect for entertaining or when you want a delicious dessert ready to go without last-minute fuss.
Why did my dump cake turn out dry or powdery on top?
A dry or powdery top on a dump cake is almost always due to insufficient butter distribution. The melted butter (or butter pats) is essential for hydrating the dry cake mix. If there are areas where the cake mix isn’t adequately covered by butter, those spots won’t bake properly and will remain dry and powdery. To prevent this, ensure you pour the melted butter evenly over the entire surface of the dry cake mix, or arrange butter pats very closely together to cover as much area as possible. Sometimes, baking for too long can also contribute to dryness, so keep an eye on your oven and remove the cake once the top is golden brown and bubbly.
