Introduction
Prepare to meet your new weeknight obsession: Air Fryer Honey Butter Garlic Chicken Tenders! Imagine perfectly crispy, golden-brown chicken tenders, impossibly juicy on the inside, each piece lovingly coated in a luscious, sticky, sweet-savory glaze that will have your taste buds singing. This isn’t just another chicken recipe; it’s a culinary revelation that combines the crave-worthy textures of your favorite fried chicken with the incredible ease and speed of the air fryer.
This recipe is an absolute winner for countless reasons. First and foremost, it’s lightning-fast, making it the ideal solution for those hectic evenings when you need a delicious, satisfying meal on the table in under 30 minutes. The air fryer works its magic, delivering that coveted crunch without the mess, guilt, or excessive oil of deep frying, meaning minimal cleanup and a dish that feels a little “healthier” without sacrificing an ounce of flavor. It’s incredibly family-friendly, appealing to even the pickiest eaters with its irresistible combination of honey’s sweetness, butter’s richness, and garlic’s aromatic depth. Get ready to transform ordinary chicken tenders into an extraordinary meal that everyone will adore.
Dive into this simple yet profoundly satisfying meal that promises to become a staple in your cooking repertoire. The perfect balance of sweet, savory, and a hint of tang, these Air Fryer Honey Butter Garlic Chicken Tenders are an explosion of flavor and texture that will leave you wondering why you haven’t made them sooner. Forget complicated steps or lengthy cooking times; this recipe is about maximizing flavor and convenience, proving that gourmet-level taste is entirely achievable on a busy weeknight.
Nutritional Information
Per serving (approximate values):
- Calories: 378
- Protein: 37.5g
- Carbohydrates: 14g
- Fat: 19.5g
- Fiber: 0.5g
- Sodium: 350mg
Ingredients
- 1.5 lbs (approximately 680g) chicken tenders, fresh or thawed
- 1 tablespoon olive oil (or avocado oil), for coating chicken
- 1 teaspoon garlic powder
- 1/2 teaspoon onion powder
- 1/2 teaspoon smoked paprika
- 1/2 teaspoon salt
- 1/4 teaspoon black pepper
- 1/4 cup (60ml) unsalted butter
- 1/4 cup (60ml) honey
- 4 cloves garlic, minced
- 1 tablespoon low-sodium soy sauce (or tamari for gluten-free)
- 1 teaspoon cornstarch mixed with 1 tablespoon cold water (for slurry)
- Fresh parsley, chopped, for garnish (optional)
- Sesame seeds, for garnish (optional)
Instructions
- Prepare the Chicken: Start by patting the chicken tenders thoroughly dry with paper towels. This crucial step helps achieve maximum crispiness in the air fryer. In a medium bowl, toss the dried chicken tenders with 1 tablespoon of olive oil, ensuring each piece is lightly coated. Sprinkle with garlic powder, onion powder, smoked paprika, salt, and black pepper. Toss again until the chicken is evenly seasoned.
- Preheat the Air Fryer: Preheat your air fryer to 375°F (190°C) for at least 5 minutes. Preheating is essential for even cooking and achieving that desirable crispy exterior, just like a conventional oven.
- Air Fry the Chicken Tenders: Arrange the seasoned chicken tenders in a single layer in the preheated air fryer basket. Do not overcrowd the basket; this is key to ensuring the chicken crisps up rather than steams. Depending on the size of your air fryer, you may need to cook the chicken in two or three batches.
- Cook the First Side: Air fry for 8-10 minutes.
- Flip and Continue Cooking: Carefully flip the chicken tenders using tongs and continue to air fry for another 7-9 minutes, or until the chicken is golden brown, crispy, and cooked through. The internal temperature should reach 165°F (74°C) when checked with a meat thermometer at the thickest part of the tender. Remove the cooked chicken from the air fryer and set aside while you prepare the sauce. Cook any remaining batches of chicken.
- Prepare the Honey Butter Garlic Sauce: While the chicken is air frying or immediately after, prepare the luscious sauce. In a small saucepan over medium-low heat, melt the unsalted butter. Add the minced garlic and sauté for about 30 seconds until fragrant, being careful not to let it brown or burn.
- Add Honey and Soy Sauce: Stir in the honey and low-sodium soy sauce. Bring the mixture to a gentle simmer, stirring constantly.
- Thicken the Sauce: Whisk together the cornstarch and cold water in a small bowl to create a smooth slurry. Pour the slurry into the simmering sauce, whisking continuously. Continue to simmer and stir for 1-2 minutes, or until the sauce thickens to a glossy, pourable consistency that will cling to the chicken. Remove the saucepan from the heat.
- Combine Chicken and Sauce: Transfer all the hot, crispy air-fried chicken tenders into a large mixing bowl. Pour the warm honey butter garlic sauce over the chicken.
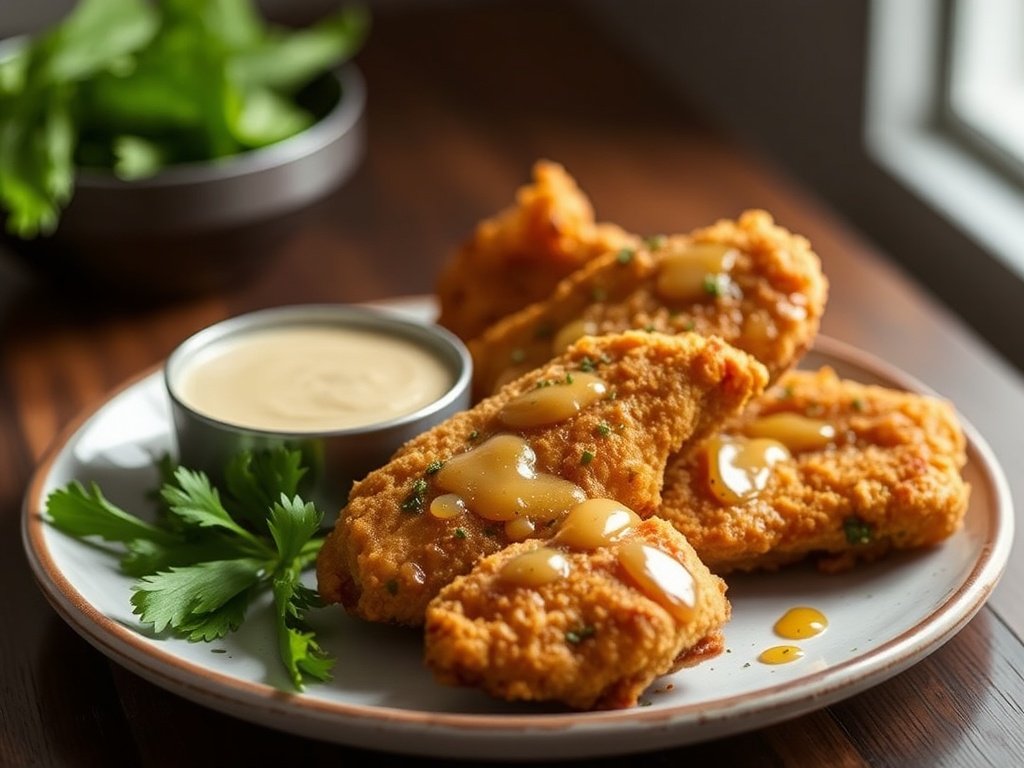
- Toss and Serve: Gently toss the chicken tenders with the sauce until each piece is thoroughly coated in the irresistible glaze. Garnish with fresh chopped parsley and a sprinkle of sesame seeds, if desired. Serve immediately and enjoy your new favorite weeknight meal!
Cooking Tips and Variations
Achieving perfectly crispy and flavorful Air Fryer Honey Butter Garlic Chicken Tenders is simple with a few expert tips. First and foremost, **do not overcrowd your air fryer basket**. This is perhaps the most critical rule for air frying. Overcrowding traps moisture, leading to steamed rather than crispy chicken. Always cook in batches, ensuring there’s enough space for air to circulate around each tender. Secondly, **pat your chicken tenders thoroughly dry** with paper towels before seasoning. Excess moisture on the surface prevents browning and crisping, so this small step makes a significant difference. Always **preheat your air fryer**; just like an oven, a preheated air fryer ensures even cooking and immediate crisping upon contact. Lastly, **use a meat thermometer** to check the internal temperature of the chicken. The safest and most delicious chicken is cooked to 165°F (74°C) without being overcooked and dry.
For those looking to elevate or customize the flavor, there are several exciting variations. To add a delightful kick, sprinkle a **pinch of red pepper flakes** into the sauce along with the garlic for a sweet and spicy fusion. A **squeeze of fresh lime juice** stirred into the finished sauce can add a bright, zesty counterpoint to the richness. For an Asian-inspired twist, consider adding **half a teaspoon of grated fresh ginger** to the sauce when you add the garlic, and finish with a **drizzle of toasted sesame oil** before tossing the chicken. You can also experiment with different seasonings for the chicken itself, perhaps adding a touch of cayenne pepper for heat or dried thyme for an herbaceous note.
Ingredient substitutions offer flexibility for dietary needs or what you have on hand. While chicken tenders are ideal for their quick cooking time and natural tenderness, you can certainly use **boneless, skinless chicken thighs** cut into strips; just be aware that the cooking time in the air fryer might need to be slightly adjusted (typically a few minutes longer). For a plant-based alternative, many brands now offer **plant-based chicken tenders** that can be air-fried according to package directions and then tossed in the same delicious sauce. If you don’t have honey, **maple syrup or agave nectar** can be used as a sweet substitute, though the flavor profile will be slightly different. For richness without butter, a good quality **olive oil or coconut oil** can be used in the sauce, though the emulsification might vary slightly. If you’re avoiding gluten, ensure you use **tamari** instead of regular soy sauce. These adjustments ensure that everyone can enjoy this incredibly versatile and delicious dish!
Storage and Reheating
These Air Fryer Honey Butter Garlic Chicken Tenders are best enjoyed fresh, right after they’ve been tossed in the warm, sticky sauce. However, if you find yourself with leftovers, they can be stored and reheated for another delicious meal. To store, allow the chicken tenders to cool completely to room temperature before transferring them to an airtight container. Keep them in the refrigerator, where they will stay fresh for up to 3-4 days. Proper storage is key to maintaining their quality and ensuring food safety.
When it comes to reheating, the goal is to revive some of that glorious crispiness. While a microwave will warm the chicken, it won’t bring back the texture. For the best results, reheating in the air fryer or a conventional oven is highly recommended. To reheat in the air fryer, preheat it to 350°F (175°C). Arrange the leftover tenders in a single layer in the basket and air fry for 5-7 minutes, or until heated through and slightly crispy again. You might want to flip them halfway through. Alternatively, you can reheat them in a conventional oven preheated to 350°F (175°C) for about 10-15 minutes, or until hot and slightly crisped. This method helps prevent them from becoming soggy and brings back some of their original appeal.
Frequently Asked Questions
Can I make this recipe with bone-in chicken?
While technically possible, this recipe is specifically designed for quick-cooking chicken tenders due to the air fryer’s rapid cooking method. Bone-in chicken, such as drumsticks or thighs, would require significantly longer cooking times and potentially different temperatures to ensure it cooks through evenly and safely. For the best results and to maintain the speed and ease of this particular recipe, we highly recommend sticking with boneless, skinless chicken tenders or cutting boneless, skinless chicken breasts into tender-sized strips.
How do I prevent the chicken from drying out in the air fryer?
Preventing dry chicken is all about proper technique and timing. First, ensure you don’t overcook the chicken; use a meat thermometer to confirm it reaches 165°F (74°C) and then remove it immediately. Patting the chicken thoroughly dry before seasoning helps create a barrier that locks in moisture while promoting crispiness. Always preheat your air fryer, as this allows the chicken to start cooking evenly right away. Lastly, avoid overcrowding the basket; when chicken is packed too tightly, it can steam rather than crisp, and uneven cooking can lead to dry spots. Cook in batches if necessary.
Can I prepare the honey butter garlic sauce ahead of time?
Absolutely! The honey butter garlic sauce can be prepared in advance, which is a fantastic time-saver for busy days. Simply follow the instructions for making the sauce, then allow it to cool completely before transferring it to an airtight container. Store it in the refrigerator for up to 3-4 days. When you’re ready to use it, gently reheat the sauce in a small saucepan over low heat or in the microwave until it’s warm and pourable again. This ensures it coats the hot, freshly air-fried chicken beautifully.
My tenders aren’t crispy; what went wrong?
If your chicken tenders aren’t achieving that desired crispiness, there are a few common culprits. The most frequent issue is overcrowding the air fryer basket; when too many pieces are crammed in, air circulation is restricted, leading to steaming instead of frying. Always cook in a single layer, in batches if needed. Another factor is not patting the chicken dry enough before seasoning; excess moisture prevents browning. Ensure your air fryer is preheated to the correct temperature. Finally, using too much oil can sometimes make the chicken greasy rather than crispy; a light coating is all that’s needed for air frying.
