Introduction
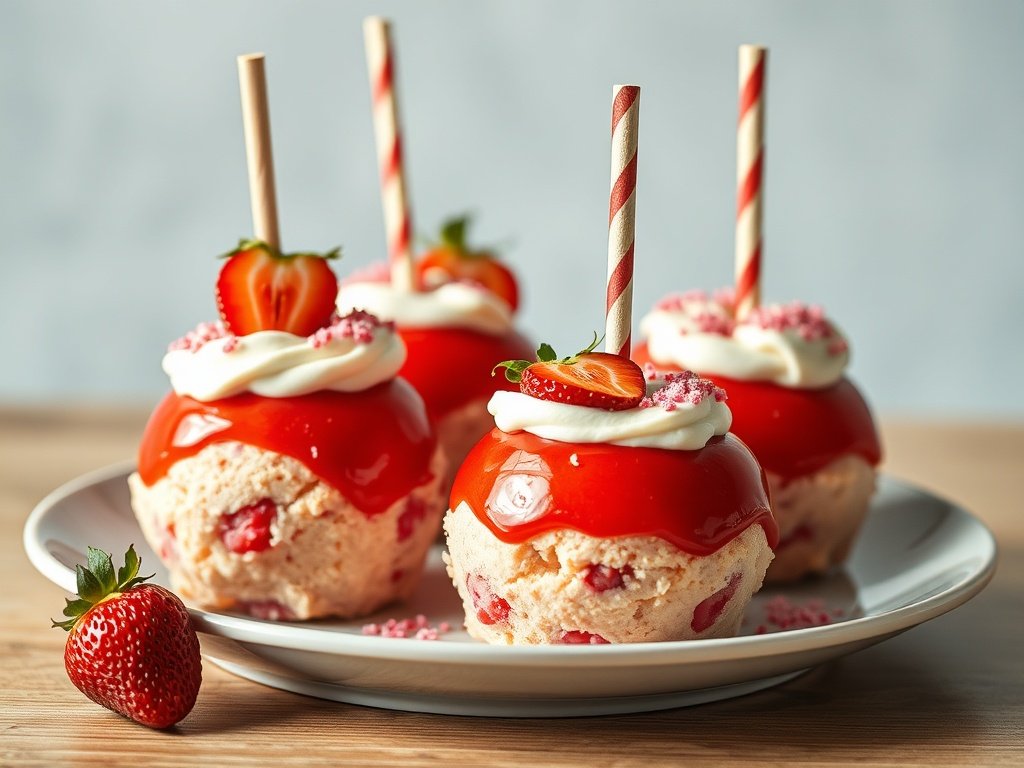
Imagine the nostalgic charm of a classic strawberry shortcake, with its tender, buttery biscuit, sweet ripe strawberries, and billows of whipped cream. Now, picture that beloved dessert reimagined, transformed into a whimsical, handheld treat that sparkles with a vibrant hue and offers an exhilarating crunch. Welcome to the world of Strawberry Shortcake Candy Apples – a culinary marvel that marries the best of two iconic desserts into one unforgettable experience. This isn’t just a candy apple; it’s a gourmet candy apple, meticulously crafted to evoke the delicate, summery essence of strawberry shortcake in a truly innovative and irresistible form. It’s a delightful fusion, offering the crisp, tart bite of a fresh apple enrobed in a sweet, strawberry-infused candy shell, generously studded with golden, crumbly shortbread, and finished with an elegant drizzle of white chocolate. This treat is designed to tantalize every single one of your taste buds, providing a symphony of textures and flavors that are both familiar and excitingly new.
This recipe for Strawberry Shortcake Candy Apples is more than just a dessert; it’s an edible work of art, perfect for elevating any occasion. Whether you’re planning a lively summer party, seeking unique party food ideas, searching for a standout homemade gift, or simply craving a unique strawberry dessert that pushes the boundaries of traditional sweets, these gourmet candy apples are your answer. They offer a vibrant visual appeal that immediately captures attention, making them an instant showstopper on any dessert table. Each bite delivers a harmonious blend of the sweet-tart crunch of the candy apple with the delicate, buttery goodness of strawberry shortcake, culminating in a truly unique dessert experience. Get ready to embark on a delicious journey that culminates in a treat that’s as fun to make as it is to devour, leaving a lasting impression of sweet nostalgia and innovative flavor.
In this comprehensive guide, we’ll walk you through every step of creating these magnificent Strawberry Shortcake Candy Apples. We’ll cover everything from selecting the perfect apples and understanding the science behind a flawless candy coating to crafting that essential shortbread crumble and adding the final, elegant white chocolate drizzle. We’ll delve into the specifics of ingredients, essential tools, and crucial techniques to ensure your success. You’ll learn how to achieve that vibrant strawberry color and authentic flavor, how to make the shortbread crumble adhere beautifully, and how to store your creations to maintain their pristine condition. Prepare to transform simple ingredients into a culinary masterpiece that is sure to impress and delight everyone who takes a bite of this whimsical, flavorful fusion.
Nutritional Information
Per serving (approximate values):
- Calories: 680-720
- Protein: 3-5g
- Carbohydrates: 160-180g
- Fat: 25-30g
- Fiber: 4-6g
- Sodium: 70-100mg
Ingredients
For the Apples and Skewers:
- 6-8 medium apples (Granny Smith for tart contrast, Fuji or Honeycrisp for crispness and slight sweetness)
- 6-8 sturdy wooden skewers or candy apple sticks
For the Strawberry Candy Coating:
- 3 cups granulated sugar
- 1 cup water
- 1/2 cup light corn syrup (or liquid glucose)
- 1/4 teaspoon red or pink gel food coloring (adjust for desired vibrancy)
- 1 tablespoon freeze-dried strawberry powder (ground fine from whole freeze-dried strawberries) OR 1 teaspoon high-quality strawberry extract
For the Shortcake Crumble:
- 10-12 shortbread cookies (about 5-6 ounces), crushed into fine crumbs (Walkers or similar buttery shortbread work best)
- 2 tablespoons unsalted butter (optional, for toasting crumbs)
For the White Chocolate Drizzle:
- 1/2 cup white chocolate melting wafers or high-quality white chocolate chips
- 1 teaspoon coconut oil or vegetable shortening (optional, for smoother melting)
Essential Equipment Checklist:
- Heavy-bottomed saucepan (at least 3-quart capacity)
- Reliable candy thermometer
- Baking sheet lined with parchment paper or a silicone mat
- Small, deep bowl for dipping apples
- Small saucepan or microwave-safe bowl for melting chocolate
- Whisk
- Pastry brush (for wiping sugar crystals)
- Spatula
- Food processor or rolling pin for crushing cookies
Instructions
1. Prep Your Apples: The Foundation of Success
- Clean Thoroughly: Begin by washing your chosen apples meticulously under warm water. Many commercially bought apples have a protective wax coating that can prevent the candy from adhering properly. Use a clean cloth or a vegetable brush to gently scrub the surface of each apple, ensuring all wax is removed.
- Dry Completely: This step is absolutely crucial. Any residual moisture on the apple’s surface will cause the candy coating to slip or become sticky. After washing, dry each apple thoroughly with a clean paper towel. For extra assurance, you can wipe them down with a small amount of rubbing alcohol on a paper towel, then let them air dry completely for about 15-20 minutes.
- Chill Your Apples: Once dry, place the apples in the refrigerator for at least 30 minutes, or up to an hour. Chilling the apples helps the hot candy coating set faster and more evenly upon contact, resulting in a firm, beautiful shell.
- Skewer the Apples: While the apples are chilling, carefully insert a sturdy wooden skewer or candy apple stick into the stem end of each apple, pushing it in about two-thirds of the way down to ensure a secure handle.
2. The “Shortcake” Element: Crafting Your Buttery Crumble
- Crush the Cookies: Place the shortbread cookies in a food processor and pulse until fine, even crumbs are formed. Alternatively, you can place them in a zip-top bag and crush them with a rolling pin. Aim for a texture similar to fine sand, ensuring no large chunks remain.
- Optional Toasting (for deeper flavor): For an enhanced, nuttier shortbread flavor, melt 2 tablespoons of unsalted butter in a small skillet over medium-low heat. Add the crushed shortbread crumbs and toast, stirring constantly, for 3-5 minutes until lightly golden and fragrant. Be careful not to burn them. Allow the crumbs to cool completely on a plate before proceeding.
- Prepare for Dipping: Transfer the cooled shortbread crumbs to a shallow dish or plate, spreading them out evenly. This will be ready for dipping after the apples are coated.
3. Perfecting the Candy Coating: Sugar Syrup Science
- Combine Ingredients: In your heavy-bottomed saucepan, combine the granulated sugar, water, and light corn syrup. Stir gently with a whisk until the sugar is mostly dissolved. Avoid stirring vigorously once the mixture starts to heat, as this can encourage crystallization.
- Heat and Monitor Temperature: Place the saucepan over medium-high heat. Attach your candy thermometer to the side of the pan, ensuring the tip does not touch the bottom. Bring the mixture to a boil.
- Prevent Crystallization: As the syrup begins to boil, use a clean pastry brush dipped in warm water to gently wipe down the sides of the pan. This removes any sugar crystals that might cling to the sides and cause the entire batch to crystallize. Repeat this step periodically as the syrup cooks.
- Add Flavor and Color: Once the syrup reaches approximately 280°F (138°C), carefully stir in the red or pink gel food coloring and the freeze-dried strawberry powder (or strawberry extract). Stir just enough to incorporate. The freeze-dried strawberry powder will dissolve and infuse a beautiful, authentic strawberry flavor and color.
- Reach Hard Crack Stage: Continue cooking the syrup without stirring until it reaches the “hard crack” stage, which is between 300-310°F (149-154°C) on your candy thermometer. This temperature is crucial for a firm, non-sticky, and shatteringly crisp candy coating. Do not rush this step.
- Remove from Heat: Once the syrup reaches the hard crack stage, immediately remove the saucepan from the heat. Allow any bubbles to subside for about 30 seconds to a minute. The syrup should be smooth and slightly viscous.
4. Dip, Decorate & Drizzle: Techniques for a Beautiful Finish
- Prepare for Dipping: Have your chilled, skewered apples and your dish of shortbread crumbs ready beside your saucepan of hot candy syrup. Ensure your lined baking sheet is also within easy reach.
- Dip the Apples: Carefully tilt the saucepan to create a deeper pool of syrup. Holding an apple by its skewer, quickly dip it into the hot candy syrup, rotating it to fully coat the apple. Work swiftly but smoothly, ensuring an even, thin layer. Avoid letting the apple sit in the hot syrup for too long, as this can cause it to heat up and release moisture.
- Remove Excess Syrup: As you lift the apple out of the syrup, gently twist it and allow any excess candy to drip back into the pan. You can also lightly scrape the bottom of the apple against the rim of the pan to remove any large drips.
- Apply the Shortcake Crumble: Immediately after dipping and while the candy coating is still very hot and sticky, roll or sprinkle the lower two-thirds of the candy-coated apple in the shortbread crumbs. Gently press the crumbs onto the surface to ensure they adhere well.
- Set the Apples: Place the decorated apple onto your prepared baking sheet (parchment paper or silicone mat). Repeat the dipping and crumbling process with the remaining apples. If the candy syrup thickens too much, you can gently reheat it over very low heat for a few seconds, stirring minimally, to restore its fluidity.
- Melt White Chocolate: Once all apples are coated and crumbled, melt the white chocolate melting wafers or chips. You can do this in a small microwave-safe bowl in 30-second intervals, stirring between each, until smooth. Alternatively, use a double boiler over simmering water. If desired, stir in 1 teaspoon of coconut oil or vegetable shortening to achieve a smoother, more drizzly consistency.
- Drizzle the Apples: Transfer the melted white chocolate to a piping bag with a very small tip, or simply use a spoon. Drizzle the white chocolate artistically over the tops and sides of the shortcake candy apples. This adds visual appeal and a complementary creamy sweetness.
5. Setting & Storing: Ensuring a Firm, Lasting Treat
- Allow to Set: Let the finished Strawberry Shortcake Candy Apples sit undisturbed at room temperature for at least 30-60 minutes, or until the candy coating is completely firm and the white chocolate drizzle has hardened. For faster setting, you can place them in the refrigerator for about 15-20 minutes, but avoid prolonged chilling as it can cause condensation.
- Proper Storage: Once completely set, store the candy apples individually wrapped in cellophane bags or in an airtight container at cool room temperature. Avoid storing them in direct sunlight or overly humid conditions, as this can cause the candy to become sticky.
Cooking Tips and Variations
Achieving perfection with candy apples, especially a gourmet version like our Strawberry Shortcake Candy Apples, often comes down to a few key techniques and knowing how to troubleshoot common issues. One of the most critical elements is apple preparation. As highlighted in the instructions, thoroughly washing and drying your apples to remove any wax is non-negotiable. Wax acts as a barrier, preventing the candy coating from adhering properly, leading to a frustratingly slippery mess. Chilling the apples before dipping is another game-changer; the cold surface helps the hot candy set almost instantly, resulting in a beautifully even, firm, and non-sticky shell. Always ensure your candy thermometer is accurate; an unreliable thermometer is the most common culprit for sticky or soft coatings. You can test it by placing it in boiling water; it should read 212°F (100°C).
When it comes to the candy coating itself, temperature is truly king. The sugar syrup absolutely must reach the “hard crack” stage (300-310°F / 149-154°C) to ensure a firm, non-sticky coating that shatters beautifully when bitten. If your coating turns out sticky, it’s almost always because the syrup didn’t reach a high enough temperature. If you encounter sugar crystallization – where the syrup turns grainy or sugar crystals form on the sides of the pan – it’s often due to stirring the syrup too much after the sugar has dissolved, or not wiping down the sides of the pan. If crystals form, you can sometimes save the batch by adding a small amount of warm water (about 1-2 tablespoons) and gently reheating, without stirring, until the crystals dissolve again, then proceeding to the hard crack stage. Using corn syrup or glucose is also a vital anti-crystallization agent, as it contains inverted sugars that inhibit crystal formation, contributing to a smoother, more stable coating.
Don’t be afraid to make these candy apples your own with creative variations. While shortbread cookies offer that classic buttery “shortcake” flavor, you could experiment with other crumb bases. Graham crackers provide a slightly honeyed, crisp alternative, while vanilla wafers offer a lighter, sweeter crunch. For a different flavor profile, consider adding a pinch of cinnamon or a tiny dash of almond extract to your shortbread crumble. The beauty of the candy coating itself lies in its versatility. Instead of strawberry, imagine a raspberry shortcake candy apple using freeze-dried raspberry powder, or even a lemon version with lemon extract and a touch of yellow food coloring. For the white chocolate drizzle, feel free to swap it for dark chocolate for a richer contrast, or milk chocolate for a sweeter, creamier touch. You could also tint the white chocolate with a drop of food coloring to match a party theme, or add a sprinkle of edible glitter for extra sparkle. The possibilities are endless, allowing you to tailor these gourmet treats to any taste or occasion.
Presentation is key, especially if you’re gifting these beautiful creations. Once the candy apples are fully set, individually wrap them in clear cellophane bags and tie them with a festive ribbon. This not only makes them look professionally made but also protects them from humidity and dust, keeping their candy coating crisp. Placing them in small gift boxes, nestled on a bed of tissue paper, adds another layer of elegance. For a party display, consider using a candy apple stand or arranging them on a tiered dessert tray. The vibrant color of the strawberry coating, the golden shortbread crumble, and the delicate white chocolate drizzle make them inherently appealing, but a thoughtful presentation elevates them from a simple dessert to a truly special experience. Remember, these are meant to be a showstopper, so showcase them with pride!
Storage and Reheating
Proper storage is essential to maintain the crispness and integrity of your Strawberry Shortcake Candy Apples. Once the candy coating has completely set and the white chocolate drizzle has hardened, it is best to store them individually to prevent them from sticking to each other or to other surfaces. The ideal method is to wrap each candy apple loosely in a cellophane bag or plastic wrap. This protective layer helps to shield the candy from humidity, which is the primary enemy of a crisp candy coating. Humidity can cause the sugar to absorb moisture from the air, leading to a sticky, weeping, or softened exterior. Ensure the wrapping is not too tight, as this can sometimes cause condensation to build up inside, which can also soften the candy.
Store the wrapped candy apples in an airtight container at cool room temperature. A cool, dry pantry or a countertop away from direct sunlight and heat sources is perfect. Avoid storing them in the refrigerator for extended periods. While a brief chill to set the candy or chocolate is fine, prolonged refrigeration can introduce too much moisture and cause the candy coating to “sweat” or become sticky when brought back to room temperature. The condensation that forms on cold items as they warm up can be detrimental to the hard crack candy shell. Therefore, keeping them at a consistent, moderate room temperature is the best approach for preserving their crunchy texture.
These Strawberry Shortcake Candy Apples are best enjoyed within 2-3 days of making them. While they can last a bit longer, their quality, particularly the crispness of the apple and the candy coating, will start to diminish over time. The apple itself will gradually soften, and the candy coating may lose some of its initial snap. It is important to note that candy apples, by their very nature, are not designed for reheating. The candy coating is a delicate sugar shell that would melt or become a sticky mess if exposed to heat. The goal is to preserve their firm, crunchy texture, which reheating would completely destroy. Therefore, plan to consume them fresh and do not attempt to reheat them. If they become slightly soft due to humidity, placing them in an air-conditioned room for a while might help to re-firm the coating slightly, but it won’t restore their original crispness if they’ve absorbed too much moisture.
Frequently Asked Questions
Why did my candy coating turn out sticky instead of hard and crunchy?
The most common reason for a sticky or soft candy coating is that the sugar syrup did not reach the correct temperature during cooking. For a truly hard and crunchy coating, the syrup must reach the “hard crack” stage, which is between 300-310°F (149-154°C) on a reliable candy thermometer. If the temperature is too low, the sugar molecules haven’t cooked enough to form the rigid structure needed for a hard coating. Another less common reason could be excessive humidity in your kitchen on the day you made them, or residual wax/moisture on the apples preventing the candy from setting properly against the fruit. Always ensure your thermometer is accurate and your apples are perfectly dry and chilled.
Can I use other types of apples besides Granny Smith, Fuji, or Honeycrisp?
Absolutely! While Granny Smith, Fuji, and Honeycrisp are highly recommended for their crispness and ability to hold up well to the hot candy, you can certainly experiment with other firm varieties. Granny Smith offers a fantastic tart contrast to the sweet candy, which many people love. Fuji and Honeycrisp provide a slightly sweeter base with excellent crunch. If you choose another apple, look for varieties that are firm and not overly juicy, as too much moisture can interfere with the candy coating. Softer apples may become mealy or release too much liquid once coated. Whatever apple you choose, ensure it’s thoroughly washed, dried, and chilled before dipping.
How far in advance can I make these Strawberry Shortcake Candy Apples?
These Strawberry Shortcake Candy Apples are best enjoyed within 2-3 days of preparation for optimal freshness, crispness, and flavor. While they can technically last a bit longer if stored correctly, the apple itself will gradually begin to soften and the candy coating might start to lose its pristine crunch. The shortbread crumble can also absorb moisture over time, becoming less crisp. For the best experience, especially if serving at a party or giving as gifts, aim to make them no more than 1-2 days in advance. Always store them individually wrapped in cellophane or an airtight container at cool room temperature to protect them from humidity and keep them at their best.
What if I don’t have a candy thermometer? Can I still make them?
While a reliable candy thermometer is highly recommended and truly essential for consistent results, it is technically possible to make candy apples without one, though it requires more experience and careful observation. The “cold water test” is a traditional method: drop a small amount of the hot syrup into a cup of very cold water. If it immediately forms brittle threads that snap when bent, it has reached the hard crack stage. If it’s still pliable, it needs to cook longer. However, this method is less precise and can be prone to error, making it difficult to hit the exact temperature needed for a non-sticky coating. Investing in an inexpensive candy thermometer is highly advisable for foolproof candy apple making.
